Nice Tower · Practical design guide
Prome AI: Powerful SketchUp Rendering Guide 2026
Prome AI supports architectural sketch rendering and concept visualization from drawings, photographs and SketchUp views. Use a clean source image, a focused prompt and a comparison workflow that keeps the design intent visible.
On this page
Turn a sketch, SketchUp view or room photo into visual design ideas. This guide explains where Prome AI fits into an architectural workflow, how to start, and what to check before choosing a plan.
Nice Tower may earn a commission through our the service referral link.
What can you use Prome AI for?
SketchUp concepts
Explore visual directions from a clean model view or sketch before developing the final render.
Interior ideas
Compare materials, lighting and styles for a room or an interior design proposal.
Exterior studies
Develop facade and atmosphere ideas for early presentations and client discussions.
Before and after


How to use Prome AI with SketchUp
- Prepare your model. Set a clear camera view and check the geometry you want to present.
- Export an image. Start with a clean view without toolbars or unnecessary annotations.
- Describe your design. Specify the building or room type, materials, lighting and intended atmosphere.
- Review the result. Compare openings, proportions and important details with your original model.
- Refine your presentation. Select useful visual directions and return to SketchUp for precise design changes.
Explore the official sketch-rendering workflow.
Keep control of the design: AI imagery can reinterpret geometry. Use your SketchUp or CAD model as the source for dimensions, technical decisions and construction documentation.
A useful architecture prompt
Contemporary two-storey house, pale stone facade, timber screens, soft afternoon daylight, eye-level architectural perspective, landscaped courtyard.
Replace these details with your own project requirements. Check the generated image against your design; a detailed prompt does not guarantee geometric accuracy.
Free access, pricing and commercial use
Check the current free allowance and paid plans on the platform before signing up. Credits, export limits, watermarks and commercial-use conditions can change.
- Choose a plan based on how many images or videos you actually need.
- Confirm download quality and restrictions before starting client work.
- Review the current license for commercial projects.
Common questions
Is Prome AI a SketchUp plugin?
This guide uses an image exported from SketchUp in the platform’s web workflow. It does not require installing a SketchUp plugin.
Can it replace a final architectural render?
It can help with concepts and presentations. For work requiring exact geometry, materials and camera control, retain your controlled 3D rendering workflow.
Can I use the output for a paid project?
Check the current terms for your selected plan and review each output for design accuracy before delivering it to a client.
Where can I watch a practical example?
Use the Watch Our Tutorial button above to open the Nice Tower demonstration on YouTube.
Build your SketchUp workflow
Prome AI: prepare a sketch that communicates the design
the service accepts architectural sketches, photographs and modeling screenshots for image-based visualization. Begin with a view that clearly communicates the massing or room arrangement. Hide dimensions, selection outlines and interface panels from the exported image. Keep enough edge definition to show openings and furniture, but avoid a screenshot so cluttered that the main design is difficult to read.
For a SketchUp interior, save one scene before exporting. Include the main wall junctions, floor plane and large furniture pieces. Use simple material zones if you want the generated image to distinguish wood, stone, upholstery and glazing. A well-composed source view usually gives a more useful starting point than asking the prompt to compensate for a confusing camera.
Choose the rendering mode appropriate to the reference and check the current controls in the interface. The official architectural workflow describes sketch rendering and concept visualization. the platform offers different interpretation settings, so a result that looks attractive may still depart from the original geometry. Evaluate that difference deliberately.
A useful prompt describes the subject, materials, light and intended mood. Try: contemporary living room, pale oak floor, off-white walls, linen sofa, soft daylight and restrained interior photography. Add only details that matter to the current decision. Keep the camera and source image constant while comparing finishes so the comparison remains understandable.
Change one part of the prompt at a time. First compare the palette, then compare lighting, then refine a particular surface. Save the prompt alongside the output and note which controls changed. If an opening moves or an extra furniture item appears, return to the source view and reduce the amount of reinterpretation rather than accepting the image as a faithful record.
Use generated images to discuss an early design direction, then develop approved choices in the measured model. the platform does not turn a perspective image into a construction drawing. Verify circulation widths, furniture dimensions and material specifications separately. The living-room wall modeling guide can help translate a selected visual direction into editable SketchUp geometry.
Compare the best output against the original at full size. Check repeated windows, railings, chair legs and reflections, which can reveal unintended changes. Keep both versions available during the presentation and identify the AI-assisted concept clearly. Confirm current credits, export sizes and commercial conditions before promising a particular deliverable to a client.
Watch the Prome AI architectural demonstration
Use this existing Nice Tower video alongside the written steps. Pause at the rendering example, reproduce it with a small test view and compare your source image to the generated result before moving to a larger project.
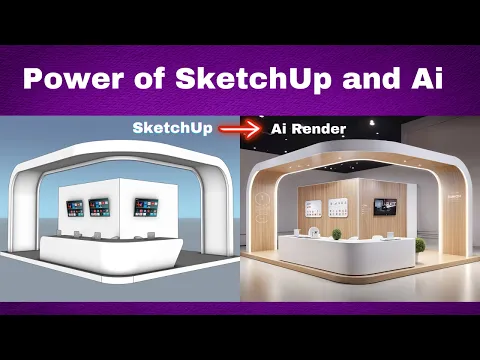
Review an architectural sketch-rendering experiment
Start an experiment with one clearly framed source image and one design question. For an exterior, the question might be whether a lighter facade finish suits the existing window rhythm. For an interior, it might be whether timber cabinetry works with a neutral floor. Keep the source camera and major objects constant so the comparison explains a material decision rather than introducing a completely different room.
Prepare a neutral baseline prompt before testing a more expressive style. Identify the building or room type, the finish being studied and the intended light. Include the features that should remain visible. Avoid combining multiple unrelated style labels, because the result becomes harder to interpret. Save the prompt beside the source image so a later comparison can reproduce the original test conditions.
Review the generated result in three passes. First, inspect the overall composition and camera framing. Second, compare doors, windows, columns, furniture proportions and circulation with the source. Third, examine material scale, reflections, small edges and repeated patterns. A strong visual impression does not compensate for a missing opening or furniture that no longer fits the room.
For a client discussion, present a small number of distinct options rather than many nearly identical images. Label the material direction and the unresolved questions below each option. Keep the original SketchUp view in the same comparison so the relationship to the actual project remains clear. If an option changes the architecture substantially, describe it as a separate design concept and develop it in the model before presenting it as a proposed solution.
Once a direction is chosen, update the model with actual finishes and check their scale. Export a fresh view and compare it with the selected concept. This step is especially useful when a generated image suggests attractive materials that were not in the original file. The visual study should lead to editable decisions, not become a disconnected picture that cannot be revised when the plan changes.
Keep a record of the service settings, the selected output and the project stage in which it was used. Confirm current commercial-use terms and export limits in the official account interface. For the next iteration, change one input at a time and write down why it changed. A clear experiment makes it easier to decide whether the tool helped answer the design question or whether the project needs a more controlled rendering workflow.