Nice Tower · SketchUp tools and workflow guides
Profile Builder 3 for SketchUp
Profile Builder 3 can help you use an established profile and assembly workflow for repeating elements. This page brings together the existing demonstrations and resource links, a practical test workflow and related Nice Tower lessons. Choose one recurring project need, check the relevant requirements and compare a small result before adding the tool to your everyday setup.
Table of Contents
Profile Builder 3 for SketchUp – Profiles, Assemblies & Parametric Modeling
Profile Builder 3 for SketchUp is a parametric modeling plugin created for profiles, assemblies, railings, fences, frames, trims, walls, and other repeatable architectural elements. It helps replace repetitive copying and manual adjustment with a faster, more consistent SketchUp workflow.
Profile Builder 3 remains widely searched and used in established SketchUp workflows. An official commercial-license purchase link is available below. Because it is an earlier release, compare its compatibility and features with Profile Builder 4 for SketchUp before choosing a version.
What Is the Profile Builder 3 Plugin?
Profile Builder 3 is a SketchUp extension for creating parametric building elements from reusable profiles and assemblies. Instead of manually copying, rotating, aligning, and repairing repeated components, you can build along paths while controlling spacing, orientation, and the structure of the finished assembly.
- Profiles: Build mouldings, walls, curbs, framing, piping, and other profile-based geometry along paths
- Assemblies: Create repeatable systems such as railings, fences, frames, slats, stairs, and streetscape elements
- Spans and patterns: Control component spacing, distribution, and repetition
- Reusable libraries: Save profiles and assemblies for use across multiple projects
- Faster revisions: Update repeated elements more consistently than a fully manual workflow
Profile Builder 3 Spans and Assemblies in Action
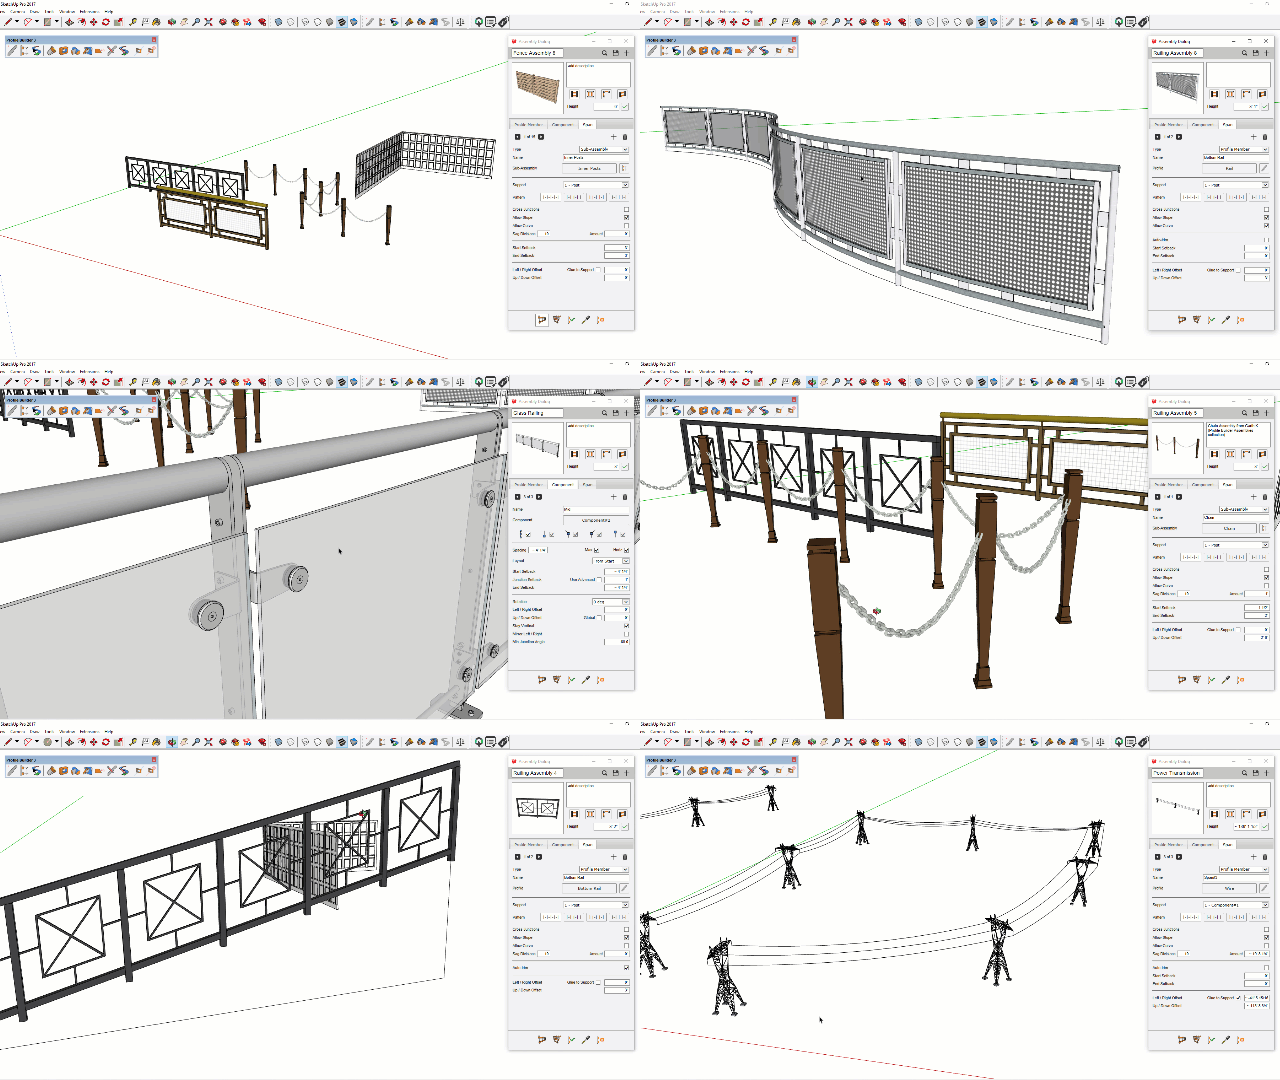
The animation below demonstrates a common Profile Builder 3 workflow: distributing repeated elements as spans. This is useful for railings, fences, balusters, façade patterns, and other assemblies that require controlled spacing and alignment.
Spans and Repetition Workflow
Why Profile Builder 3 Is Useful for Real Projects
Architectural Details and Façade Patterns
Create repeating façade fins, trims, frames, mouldings, and profile-based architectural details without rebuilding every element manually. A parametric workflow makes design changes easier to manage across repeated geometry.
Railings, Fences, and Balusters
Profile Builder 3 is often used as a SketchUp railing plugin because its assemblies can distribute posts, rails, panels, and other repeated parts along a path with consistent spacing and alignment.
Interior Design Workflows
Interior designers can use profiles and assemblies for wall trims, skirting boards, paneling, shelving, cabinet details, and decorative frames. For guided project-based instruction, explore our online SketchUp courses.
Profile Builder 3 vs Default SketchUp Workflow
| Workflow | Default SketchUp | Profile Builder 3 |
|---|---|---|
| Repeating elements | Manual copying and alignment | Parametric spans and assemblies |
| Profiles along paths | Multiple manual operations | Dedicated profile workflow |
| Design revisions | Repeated manual corrections | More consistent updates |
| Best suited for | Simple one-off geometry | Production work and repeatable systems |
Profile Builder 3 Download, Availability, and Safety
Users searching for a the extension download or the extension free should avoid unofficial, modified, or cracked installers. the extension is a commercial release, and third-party copies may be unsafe, outdated, or unlicensed. Use the official commercial-license purchase link on this page and verify compatibility before ordering.
Before purchasing or installing, confirm compatibility with your exact SketchUp version and operating system. If you already own a the extension license, use the official developer resources and your original account or license information to locate legitimate downloads or upgrade options.
the extension and Profile Builder 4
This page documents the the extension workflow and provides its official affiliate purchase route. Before ordering, compare it with the newer release instead of assuming either version is automatically the best choice for your SketchUp setup. Our Profile Builder 4 guide explains the newer profiles, assemblies, library, trial, and compatibility information.
Related SketchUp Resources
- Free NT Plugins for SketchUp
- Professional SketchUp Plugins
- Premium SketchUp 3D Models
- Online SketchUp Courses
- SUAPP AI for SketchUp Rendering
Buy the extension Commercial License
Use the official affiliate purchase link below for the the extension Commercial License. Confirm its compatibility with your SketchUp version and operating system before completing the order.
Buy the extension Commercial LicenseAffiliate Disclosure: This page contains an affiliate link. If you purchase through this link, NiceTowers may earn a commission at no extra cost to you.
Frequently Asked Questions
What is the extension used for in SketchUp?
the extension is used for parametric profiles and repeatable assemblies, including railings, fences, trims, frames, walls, and other architectural details.
Is the extension still the current version?
No. the extension is an earlier release, while Profile Builder 4 is the newer version. An official commercial-license purchase link for the extension is still provided on this page; compare compatibility and features before purchasing.
Is the extension free to download?
No. the extension is a commercial plugin, not a permanently free extension. Avoid unofficial free-download copies and use the official licensed purchase route provided on this page.
Is the extension good for railings and fences?
Yes. Its assembly workflow can distribute posts, rails, panels, and repeated components with controlled spacing and alignment along a path.
Does Profile Builder replace SketchUp native tools?
No. It extends SketchUp with profile-based and assembly-based workflows while continuing to work alongside SketchUp’s native modeling tools.
Should a new user choose the extension or Profile Builder 4?
A new user should compare the extension with the newer Profile Builder 4 release and confirm compatibility with their SketchUp version before purchasing.
6 practical checks for Profile Builder 3 for SketchUp
This page covers an earlier Profile Builder release and preserves its existing purchase route. Compare supported versions and upgrade information before choosing it for a new setup. Start with a simple profile and path, then test a revision. If you already maintain an established library, check how that library behaves before migrating a production project.
1. Define a small test before installing
Use a railing path with consistent post spacing and a saved profile as a manageable starting point. Write down the change you need and the view or report that will demonstrate it. Profile Builder 3 should be assessed against that result, rather than the size of a feature list. Save a separate working copy so an experiment does not replace the model you depend on.
2. Prepare the model and selection
Confirm units, object scale and component organization before running a new operation. Name the objects that belong to the test and isolate them from unrelated geometry. Check the active editing context so the tool receives the intended selection. A well-prepared starting model makes it easier to identify whether an unexpected result comes from input geometry, settings or the operation itself.
3. Compare an initial result with the original
Start with restrained settings and inspect the output from more than one view. For this workflow, pay particular attention to path orientation, assembly spacing and release compatibility. Keep the original available for a side-by-side comparison. Look beyond the first successful operation: consider how a later design revision changes the object and whether ordinary editing still remains understandable.
4. Check a revision and a saved file
Change one relevant dimension or placement, inspect the update and save a test version. Reopen that file and check the model again before adopting the technique throughout a larger project. Confirm that names, materials and visibility remain clear to another person. Record the settings you used so the result can be reproduced instead of relying on a remembered sequence of clicks.
5. Review installation and license information
Use the developer information for Profile Builder 3 to confirm current editions, requirements and support. Check your exact SketchUp release and operating system. A trial, subscription and permanent license may have different conditions. Follow our RBZ installation guide for orientation, then follow the instructions specific to the chosen extension.
6. Apply the workflow to a real design
Once the small test is repeatable, use it on a limited part of your design and assess the time required for both modeling and cleanup. Profile Builder 3 is useful when it helps you use an established profile and assembly workflow for repeating elements. Compare the complete task, including revisions, presentation and delivery. Expand the technique only after the result meets the practical requirements of your own project.
Questions before choosing Profile Builder 3
What should I check before using this workflow?
Check path orientation, assembly spacing and release compatibility. Read the current developer guidance and use a test copy to compare the result. Software tools support a modeling process; the final dimensions, geometry and project information still need to match the design you intend to communicate.
Where can I learn the next step?
Explore our SketchUp project tutorials, compare modeling tools or choose a format from the live course collection. Use a relevant lesson to practice a complete project instead of collecting extensions without a clear purpose.
Practice a complete SketchUp project
Use these Nice Tower lessons to practice installation and project modeling. They are related learning examples; check the specific developer demonstrations above for the exact extension operation.