
Nice Tower · Practical design guide
Helix Along Curve: Powerful Spiral Stair Guide 2026
Helix Along Curve helps develop helical paths for spiral stairs and related details. Follow the guide to organize the curve, evaluate pitch and inspect the relationship between treads, railings and the surrounding circulation.
On this page
NICE TOWER · SPIRAL MODELING
Build a clear spiral-stair model by separating repeated treads from the rising handrail path. This tutorial combines a simple geometry example with Helix Along Curve controls and checks for a consistent result.
Watch the Helix Along Curve railing example
This Nice Tower video combines Shape Bender and Helix Along Curve for a curved stair fence. It illustrates a railing workflow; the extension does not automatically create a complete compliant staircase.
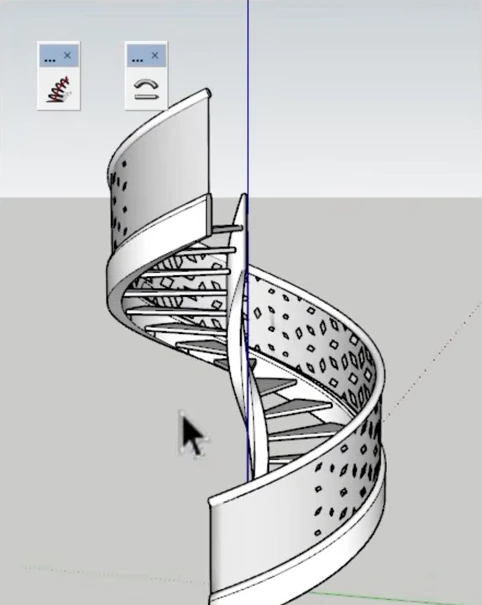
Plan the Helix Along Curve stair and handrail
Plan three independent elements: the central axis or guide, a set of rigid treads, and the rising handrail path. Give each its own group. This makes the model easier to revise when the radius, height or number of steps changes.
Helix Along Curve by 3dalbertsoft creates helical curves or tubing along a selected guide. Use it for the rising path rather than expecting a complete stair-building dialog. Find it in the creator’s plugin listing; the documented menu is Draw → Helix Along Curve.
Calculate a Helix Along Curve practice model
Define the total rise H, the number of turns T, and the number of equal height increments N. For a regular illustrative layout:
- Rise per increment = H ÷ N.
- Rotation per increment = 360 × T ÷ N degrees.
- Helix pitch = H ÷ T.
For a 3,000 mm practice rise, one full turn and 16 equal increments, the increment is 187.5 mm and the rotation is 22.5°. These numbers are an example for learning the model geometry, not a construction specification.
Keep the top landing separate. If the first reference tread is at the bottom, repeated positions 1 through 15 cover the intermediate levels; position 16 reaches the full rise and full turn. Decide how your actual landing and tread arrangement should work before treating a practice array as a finished design.
Build the rigid tread arrangement
Draw one tread at the intended radius and thickness, then make it a component. Place the rotation center on your stair axis. Create the next copy with the calculated angular change and move that copy upward by one height increment.
Continue the same rotation-and-rise relationship for the remaining positions. Group the assembly after checking the sequence in plan and elevation. Component instances let you refine the tread shape consistently while preserving a repeatable layout.
Inspect the center connection and outside edge separately. Avoid scaling a finished tread to make an awkward array look correct; correct the radius, pivot and increment values at the source.
Create a Helix Along Curve handrail path
Select the guide and activate Helix Along Curve. The creator’s documented controls include start and end radius, turns, segments per turn, starting angle, direction, noise and optional tube settings. For a regular practice stair, start with equal radii and zero noise.
Use the same number of turns and rise relationship as the tread model. Adjust the path’s height to the intended rail position and compare it against the first, middle and last treads. Choose the direction that follows the stair’s actual ascent.
Start with a modest segment count for the trial. Compare the curve in a close view and increase detail only if the shape needs it; dense geometry should solve a visible problem.
The creator’s parameter discussion explains the available controls. Labels can vary with installation and version.
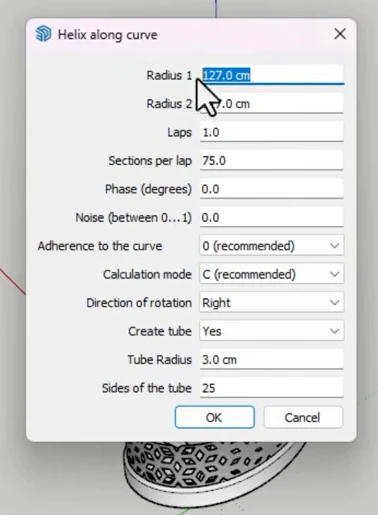
Finish and inspect the Helix Along Curve rail
Keep a copy of the path before creating tube geometry or sweeping a profile. A clean guide makes it easier to compare a round rail, a different profile or a revised radius without rebuilding the stair.
Review the assembly from above, from the side and from the approach to the stair. Check the start and end transitions, the relationship to landings, and any intersections between rail and tread geometry.
For decorative infill that bends with the stair, use the Shape Bender guide. Keep posts separate when they need to remain vertical or retain fixed dimensions. A modeled handrail still needs the appropriate design and construction review for a real project.
Helix Along Curve practice project and quality checks
A measured Helix Along Curve practice exercise
Use the earlier 3,000 mm rise and 16 equal increments as a classroom model. Draw the stair axis and a simple reference circle before adding decorative detail. Name the tread component and keep the guide geometry in a separate group. This setup lets you compare the path with the repeated treads without selecting a mixture of curves, faces and finished rail geometry.
Place the first tread at the bottom reference level. Copy it by the calculated 22.5 degree rotation and raise the copy by 187.5 mm. Inspect this first pair before repeating the relationship. If the pivot is misplaced, every subsequent tread will inherit that error. Correct the center and height at this small stage instead of trying to repair the entire array later.
Check the intermediate tread at half a turn. In this illustrative arrangement, eight increments correspond to 180 degrees and 1,500 mm of rise. This is a useful checkpoint because it verifies both angular direction and height. If the half-turn position is on the expected side but at the wrong level, examine the vertical increment rather than changing the radius.
At the full turn, sixteen increments reach the original plan direction at the total rise. Keep the landing arrangement explicit. A landing is not automatically the same object as the repeated tread, and the entry and exit connections need their own modeling decisions. Use a simple landing placeholder while learning the relationship between the stair and the rising rail.
Seven steps for a clear modeling trial
- Record the total rise, turns and number of increments.
- Draw and group the axis and reference geometry.
- Create one tread component at the intended radius.
- Check the first rotated and raised copy.
- Inspect the half-turn and full-turn positions.
- Create a separate helical rail path and compare its direction.
- Review the start, end and landing connections before adding detail.
Keep these seven steps visible beside your modeling window during the first exercise. Their purpose is to make an incorrect value easy to isolate. If you change the number of treads, recalculate both the angular increment and the vertical increment. Changing only one makes the repeated stair and the rail describe different arrangements.
Compare the Helix Along Curve handrail in three views
In plan, inspect the rail radius and its relationship to the outside tread edge. In elevation, inspect its rise and the transition to the landing. In perspective, check whether the start and end are understandable from the approach to the stair. Each view exposes a different problem; a persuasive perspective does not verify all the relationships.
Use a plain curve first. Add tubing or a swept profile only after the guide follows the intended ascent. Keep a named copy of the accepted path. If a round tube is replaced by another profile later, you can reuse that guide instead of rebuilding the stair. The same approach makes it easier to compare several rail designs around one tread arrangement.
Helix Along Curve parameter checklist
| Parameter | Why it matters | What to compare |
|---|---|---|
| Radius | Positions the rail relative to the axis | Outside tread edge in plan |
| Turns | Controls angular travel | Entry and exit directions |
| Rise relationship | Keeps the path aligned with the stair | First, middle and last levels |
| Starting angle | Positions the first point | Bottom tread and approach |
| Rotation direction | Follows the correct ascent | Half-turn checkpoint |
| Segments and tube sides | Balance curve appearance and geometry load | Close view at final output scale |
Helix Along Curve detail and model performance
A presentation model and a close product-style image need different levels of detail. Begin with a light path and simple treads. Add more segments when a visible faceted edge affects the intended view. Increasing every setting at the start makes revisions slower and can hide a basic layout mistake behind dense geometry.
Keep repeated treads as component instances and separate decorative infill from structural-looking posts. If posts need to remain vertical, inspect them independently from the curved rail. The railing shown in the Nice Tower video is a modeling demonstration; use your own project requirements to decide which elements should bend and which should retain rigid dimensions.
Prepare a useful handover
Save the guide, repeated tread arrangement and finished rail in clearly named groups. Include a simple plan and elevation scene and note the practice values used. Keep discarded alternatives out of the presentation view, but preserve the accepted source in the working file. Before sharing, reopen a saved copy and confirm that the geometry, material appearance and landing relationships remain clear.
A final visual check should include the first tread, the middle of the ascent and the top transition. These are the points most likely to reveal a mismatched path or a confusing connection. Treat the resulting SketchUp model as a design and learning aid; project-specific construction requirements still need their own review.
Helix Along Curve troubleshooting and questions
Why is the helix going in the wrong direction?
Check rotation direction and the guide orientation. Compare the path’s lowest point to the start of the stair before adding detailed rail geometry.
Why does the rail drift away from the treads?
Compare the radius, rise, turns and start angle against the same values used for the tread layout. Check whether you are measuring from the stair center or a different edge.
Can the plugin generate all the steps?
This guide uses Helix Along Curve for the rising path. The rigid treads are a separate component-copy workflow.
How can I reduce file size?
Use only the segment and tube-side detail needed for the final view, keep repeated treads as components, and remove discarded trial geometry after saving your source version.
Helix Along Curve is a legacy extension. Test the listed version in your installed desktop SketchUp release before using it in a project.
Continue learning with our free SketchUp plugins, SketchUp tutorials and live SketchUp courses.
Shape Bender: curved facades and railings · FixIt101: repair imported geometry · Helix Along Curve: spiral stair workflow
Compare two Helix Along Curve spiral arrangements
Keep the total rise fixed and compare one turn with one and a quarter turns in a practice model. For the same number of equal increments, the second arrangement has a larger angular increment while the vertical increment stays the same. This controlled comparison helps distinguish the effect of turns from the effect of tread count.
For a 3,000 mm rise and sixteen increments, one and a quarter turns gives 28.125 degrees per increment. The vertical increment remains 187.5 mm. The pitch becomes 2,400 mm per turn because the rise is divided by 1.25. These are mathematical relationships for the exercise; they do not establish acceptable dimensions for a real staircase.
Compare the entry and exit directions in plan before generating the finished rail. The second arrangement reaches a different final direction. If the landing must connect to a specific doorway, that difference matters more than whether the spiral looks attractive in a single perspective. Use a plain landing placeholder and check the relationship early.
Revise the Helix Along Curve path and treads together
When changing the number of turns, update the tread rotation and compare the helical path using the same intent. A rail based on one turn and a tread array based on one and a quarter turns will not describe the same ascent. Keep the values together in a model note so that you do not adjust one element and forget the other.
After the layout is consistent, compare a round rail with a different profile using copies of the accepted guide. Keep the guide itself unchanged during this profile comparison. If the new rail appears to intersect the treads, inspect its radius and vertical position before redesigning the entire stair. A local profile issue and a layout issue require different corrections.
Use scenes to expose mistakes
Save one scene looking straight down the axis and another looking across the stair. The first makes the angular arrangement clear; the second reveals the height relationship. Add a close scene at the top transition. These views provide a repeatable review routine when you return to the model after changing a parameter.
Keep notes about the specific trial that produced the accepted path. Record turns, radii, direction and the source guide. If a colleague asks for a wider stair, you can identify which relationships need revision rather than scaling the completed assembly without understanding the consequences.
Before presenting the result, hide unused alternatives and confirm that the active scenes show the correct revision. Retain the guide and the rigid tread components in the working model. A clear source arrangement is useful for future rail changes, while the presentation view can remain simple and readable. The Helix Along Curve exercise is successful when you can explain and revise the relationship between the path and the stair, not merely when you have generated a dense spiral.
Finish the spiral as an organized stair assembly
Check the rail path and tread sequence together instead of judging the helix in isolation. Keep treads, supports and railing in separate groups, then review the assembly from above and at eye level. Confirm real project dimensions and local stair requirements before treating a visual model as a buildable stair. Use architectural design lessons to develop the surrounding circulation and landing.