
Nice Tower · Practical design guide
Shape Bender SketchUp: Powerful Bending Guide 2026
Shape Bender SketchUp workflows depend on a prepared straight object, a reference line and a suitable curve. Follow the demonstration, inspect the bent geometry and keep the source component available for revisions.
On this page
NICE TOWER · SHAPE BENDER WORKFLOW
Turn a straight facade or railing assembly into curved geometry with Shape Bender. This guide connects the selection workflow to practical checks for length, orientation and repeatable design revisions.
Watch the curved railing example
This Nice Tower demonstration shows a straight patterned railing transformed to follow a curved stair. Watch the reference geometry and final shape before trying the workflow below.
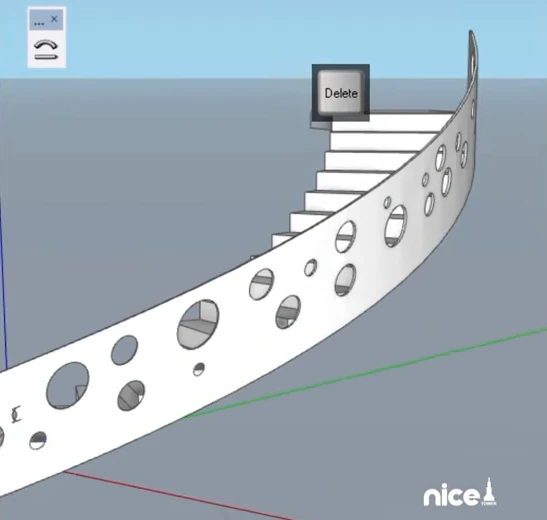
Prepare the object, reference line and path
Keep the original design in a separate group and work on a duplicate. Use a simple rail or facade module for your first Shape Bender trial; an entire imported building makes a poor diagnostic test.
The Shape Bender setup uses three separate pieces: a grouped or component object, a straight reference edge aligned with the red axis, and one continuous destination curve. Keep the guides outside the object’s editing context. Choose a reference length that corresponds to the portion you want to bend.
For a facade, sketch the intended footprint in plan first. Decide whether the finished curve should follow the inside face, outside face or center of the assembly. Label this decision in your model so you can compare later revisions consistently.
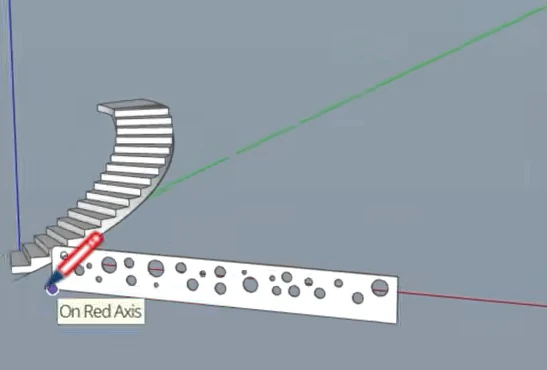
Run Shape Bender and check the preview
- Select the grouped object.
- Activate Shape Bender from its installed toolbar or the Chris Fullmer Tools menu.
- Pick the straight reference edge, then the continuous destination curve.
- Inspect the green Shape Bender preview. The Up and Down arrow keys reverse the path and reference orientation when needed.
- Press Enter to commit only when the preview follows the intended direction.
These controls are described in SketchUp’s Shape Bender guide. Keep the generated result separate from your untouched source.
Plan a curved facade without accidental stretching
Compare source length with path length before adding fine details. A useful geometric check for a circular arc is arc length = radius × angle in radians. For a semicircular facade with a 3 m radius, the centerline length is approximately 9.425 m. A straight source assembly of that length is a sensible starting point for a comparison model.
If you divide that illustrative source into 12 equal bays, each bay is about 0.785 m wide. Bend a lightweight trial first and inspect opening widths near both ends and the middle. Record the source dimensions and compare the result rather than assuming every member retains its original shape.
This is especially useful for decorative screens, repeated openings and a curved soffit. When a panel must remain flat and manufactured dimensions must stay fixed, model individual panels along the path instead of treating a bent surface as a fabrication drawing.
Use a separate strategy for rails and posts
A continuous handrail and a series of rigid posts have different modeling needs. Bend a continuous decorative rail or infill as a trial, then check its profile at the start, middle and end. Keep posts separate if they need to remain vertical or identical.
For a sloping stair, check the path in elevation as well as plan. A convincing top view can hide a rail that rises incorrectly. Compare the rail against the stair edges in at least two views, and examine clearance around the first and last tread.
If the design involves a spiral, continue with our Helix Along Curve workflow for the rising path.
Troubleshoot a bend that looks wrong
Nothing happens when selecting the guides
Reduce the trial to one group, one reference edge and one connected path. Check editing context, selection and red-axis alignment. Verify that the extension loaded successfully before rebuilding your complex model.
The Shape Bender result faces the wrong direction
Revisit the preview orientation rather than rotating a wrong result into place. Compare where the first and last elements land against your intended start and end points.
The facade or rail changes proportions
Measure the reference and path lengths. Remove fine details from the test, compare a plain strip, and only restore the full assembly once the proportions are acceptable. Keep an independent dimensioned source for future corrections.
Shape Bender practice project and quality checks
A repeatable Shape Bender practice project
Start with a small balcony screen rather than a complete building. Draw a plain rectangular strip, make it a group and name it Source rail. Place a copy beside the original and name the copy Bend trial. This modest setup makes a wrong selection or reversed direction easy to spot. Once the plain strip bends correctly, use the same guide arrangement to test a perforated strip like the one in the video.
Write down three measurements before running Shape Bender: the source length, the destination curve length and the strip thickness. Keep a screenshot of the straight source in the same model folder. After the bend, compare the end positions and check the thickness in a close view. This comparison is more useful than judging the entire result from a single attractive perspective.
Now create two destination curves with the same overall design intent but different segmentation. Keep the source unchanged for both trials. Compare the silhouette at the outside edge and the shape of any repeated openings. A coarse curve may show an obvious faceted outline; a denser curve may make the model heavier. Choose the lightest trial that looks correct at the scale of your intended drawings or render.
When adding openings, keep the first and last opening away from the ends of the strip. This leaves a clearer connection zone and makes it easier to see whether the end faces have changed. Use a small number of openings for the diagnostic model. Add the full pattern only after the reference setup and proportions are satisfactory.
Compare three Shape Bender design options
For an architectural presentation, place three results on separate tags: a shallow curve, a tighter curve and a straight baseline. Keep their source assemblies identical. Give each result a descriptive group name that records the radius or revision. The comparison then answers a design question, such as which curve aligns with the balcony edge, instead of becoming a collection of unrelated experiments.
Save scenes for a plan view, an elevation and a close view of the end connection. Use the same camera positions for each alternative. If an option looks good in perspective but overshoots the facade footprint in plan, correct the guide rather than stretching the finished group. Keep the source tag hidden during presentation, but retain it in the working file.
If the railing includes rigid brackets, vertical posts or glass panels with fixed manufactured dimensions, do not assume the bent assembly is a production model. Separate those pieces from the continuous rail. Use the bent result as a visual reference, then position the rigid parts according to the intended construction logic. Shape Bender is useful for exploring a form; it does not replace the dimension checks that a real facade or railing requires.
Shape Bender diagnostic table
| What you see | First check | Useful next trial |
|---|---|---|
| Nothing happens | Object selection and guide context | One simple group and one connected path |
| Rail lands on the wrong side | Preview orientation and start point | Reverse the preview before committing |
| Openings look stretched | Source length against path length | Test a plain strip without openings |
| Curve looks angular | Destination curve segmentation | Compare one slightly denser guide |
| Viewport becomes slow | Repeated detail and discarded trials | Use a lighter source for design revisions |
Before sharing the Shape Bender model
Open a saved copy and inspect the result with the source hidden. Look for accidental loose edges, overlapping groups and end connections that only appeared correct from one view. Keep the rail, posts and surrounding stair in clearly named groups. Make sure the model opens in the SketchUp version used by the person receiving it. A useful deliverable includes a clean result, the preserved source and a short note describing which guide produced the approved alternative.
For your next exercise, bend the same plain strip around a gentler arc and compare the two outcomes. Change one variable at a time. This gives you a reusable understanding of the setup and makes future facade revisions faster than repeatedly rebuilding a complex assembly from scratch.
Download, compatibility and common questions
Use the official CLF Shape Bender listing or the creator’s SketchUcation listing. Shape Bender is a legacy extension; the old listing is not proof of compatibility with every current SketchUp release. Test it in your installed desktop version on a copy.
Does Shape Bender automatically build a railing?
It bends prepared geometry. You still design the railing, choose the guides and inspect the result.
Can I use it for a curved facade?
Yes, a prepared facade assembly can be a modeling example. Check dimensions and keep rigid panels separate when their shape must be preserved.
Do I need to recreate my source every time?
Keep a named, untouched source group. Duplicate that source for each test so different designs remain comparable.
Continue learning with our free SketchUp plugins, SketchUp tutorials and live SketchUp courses.
Shape Bender: curved facades and railings · FixIt101: repair imported geometry · Helix Along Curve: spiral stair workflow
Choose the guide from the architectural intention
Consider a balcony whose visible outside edge is the line that matters in the final elevation. Draw that edge before deciding where the source strip belongs. The inside surface and centerline have different lengths, even when all three follow the same circular sweep. Treating them as interchangeable can lead to a plausible bend that fails to align with the intended footprint.
For a semicircular strip, increasing the chosen radius by 100 mm increases the corresponding arc length by about 314 mm. This is a geometric comparison, not a setting specific to Shape Bender. It explains why a reference based on the outside edge may not match a reference based on the centerline. Write the chosen baseline into the group name or model note before comparing alternatives.
Use the original straight source to investigate that difference. Keep its thickness fixed and change only the guide you are comparing. If you change both the source proportions and the destination curve at once, the reason for a different result becomes difficult to identify. A small controlled trial is useful even when the final model includes many repeated openings.
A facade screen example
Imagine twelve decorative bays around a half-circle. Begin with the plain screen and verify its start and end positions. Add one representative opening and inspect how it appears near the center and near an end. If those locations behave differently, compare the local geometry before duplicating a detailed opening across the entire source.
When the pattern is acceptable for the intended presentation, retain a second copy without the openings. That simpler form can be used for quick design revisions, massing views or an early render. The detailed version belongs in close views where its pattern is visible. Keep both versions clearly named so that the light version is not accidentally mistaken for the approved detailed assembly.
Record a decision, not just an attractive image
A helpful review image shows the bent result with its guide and the source measurements. Take the view from a consistent camera and include a separate close view of one connection. In the model note, record which edge was used as the reference, which direction was accepted and which alternative was rejected. This gives the next revision a practical starting point.
Finally, check whether the proposed form solves the actual design question. Does it follow the balcony footprint? Does it meet the end wall in the intended location? Are rigid parts still identifiable? These checks keep the Shape Bender workflow connected to the architectural model instead of treating a successful bend as the end of the design process.
From a bent test piece to a clean project component
Inspect the result from the front, rear and ends of the curve. Check thin faces and intersections, then replace the straight source component only after the bent copy passes your review. Keep the source line and curve in a separate working group for later revisions. For a helical path rather than a planar bend, compare the Helix Along Curve guide instead of forcing Shape Bender into a different task.