
AI rendering video tutorial — Watch and Practice
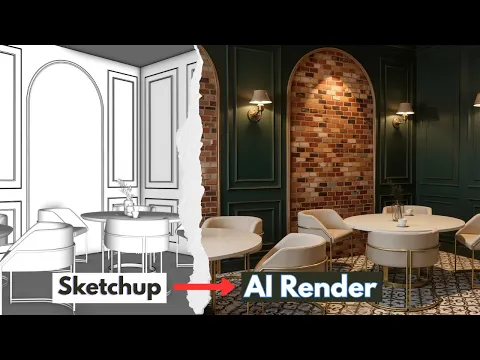
Watch the Nice Tower SketchUp-to-AI-render demonstration and use the practice notes below to review an interior visualization. The process starts with a design model and a clear image rather than an empty prompt. Keep the original view available as you compare generated alternatives, and separate useful ideas about atmosphere from changes that conflict with the geometry or requirements of the room.
AI rendering video tutorial: 4 steps to practice
1. Prepare an interior view
Choose a camera that clearly shows the arrangement of the room and its important features. Remove unnecessary interface elements from the reference image and check that furniture and openings are readable. A cluttered view can make the design harder to interpret. Save the original camera so later comparisons use the same composition.
2. Describe the intended result
Identify the room type, main materials, lighting conditions and mood you want to explore. Keep the description tied to the actual design rather than combining unrelated styles. Test a small number of alternatives and record the changes between them. This makes it easier to understand which instruction influenced the visual result.
3. Compare geometry and atmosphere
Inspect windows, door openings, furniture proportions and other defining elements against the source view. A generated image can improve atmosphere while changing important design details. Mark those differences before using the image in a presentation. Treat the output as a visualization study and continue using your measured model for dimensions and technical decisions.
4. Refine a useful option
Choose an alternative that supports the project brief and review it with the original view beside it. Return to SketchUp for precise design changes instead of accepting an unintended geometric alteration. Keep the source image, prompt and selected result together. This record makes a later revision easier to explain and prevents confusion between the design model and a visual concept.
Practice with this AI rendering video tutorial
Keep a short record of the inputs, changes and result from your AI rendering practice. Save the starting model and a separate working copy, then note the step at which your result differs from the demonstration. A clear comparison helps you decide what to repeat and makes a later question easier to explain. Repeat the exercise with one deliberate variation after the original example is understood.
When reviewing AI rendering, compare the result with the purpose of the exercise rather than only its appearance in a screenshot. Check the project from another view, inspect the important geometry and identify which choices depend on your software version or project brief. Keep the useful decisions and revise the ones that do not support your own design. The video remains a visual learning reference, while your project requirements determine the final result.
Evaluate a generated interior
Compare the selected image with the source at the same camera angle. Start with openings, ceiling height and the placement of large furniture. Mark anything that differs from the intended design before judging the material palette. This prevents a compelling atmosphere from hiding a change that would make the image misleading as a representation of the project.
Next review the visual choices that are useful for exploration. Lighting, color relationships and material contrast may suggest a direction worth testing in the model. Describe that direction in plain terms and make the corresponding design changes deliberately. Keep the generated image as a reference rather than treating its unverified details as instructions for the measured scene.
Save the source view and selected output together with the description used to generate it. Record why you kept that option and what still needs correction. If another revision is needed, begin from the confirmed design requirements. A clear comparison makes the process easier to explain to a collaborator and preserves the distinction between a visualization study and a final technical model.
Resources for this AI rendering video tutorial
After watching this AI rendering video tutorial, open AI Rendering Training for SketchUp. Then explore SketchUp AI rendering guide for a related next step. Choose a resource that addresses the task you are practicing; you do not need to follow unrelated lessons simply to complete this exercise.
AI Rendering Training for SketchUp
Read the companion guide and compare its resources with the operation shown in this video.
Open companion guide →SketchUp AI rendering guide
Use this related collection to plan the next practical task for your own project.
Explore related resources →Evaluate an interior concept
Review an AI interior image against the room layout before judging its mood or surface detail. Check openings, furniture placement and the relationship between adjacent walls. A visually appealing interpretation may have changed a circulation route or introduced an object that was absent from the input. Keep the original design view available while comparing the result.
Separate useful ideas about lighting and materials from changes that require a new modeling decision. When refining an image, make a deliberate change to the brief and compare it with the previous version rather than replacing the entire direction at once. Save the input, prompt and selected output together for later review. Use the generated image as a presentation or exploration aid while retaining the measured model as the reference for dimensions and technical design decisions.
AI rendering video tutorial: common questions
Can an AI image replace the measured model?
Keep the measured model as the source for geometry and dimensions. Use generated imagery for visual exploration and check every important design detail against the original.
What should I do if the video does not play here?
Use the original YouTube link above to open the same video directly. Availability and any access requirements are controlled by the video owner. The embedded player retains its normal playback and full-screen controls.
How can I practice AI rendering after watching?
Follow the four-step plan on this page, save your starting model and compare one small variation with the original result. Return to the relevant part of the video when a step needs another review.