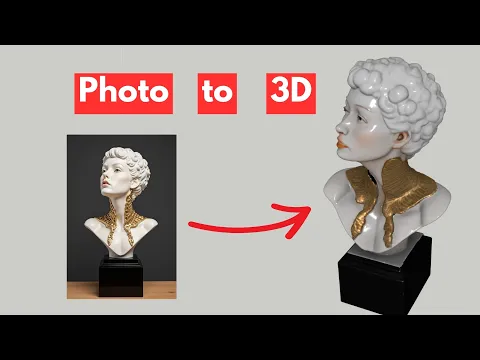
AI photo to 3D model tutorial — Watch and Practice
Watch the Nice Tower SketchUp and SUAPP AI demonstration, then use the checks below to evaluate a generated asset before putting it into a design project. A reference photograph can be a useful starting point, but the generated geometry still needs inspection. Treat the output as a candidate model and compare it with the dimensions, proportions and details your project actually requires.
AI photo to 3D model tutorial: 4 steps to practice
1. Choose a clear reference
Use an image that makes the main object easy to distinguish from the background. Consider whether important edges or surfaces are hidden, cropped or obscured by shadows. A single photograph cannot show every part of an object, so identify the areas you will need to verify after generation. Keep the source image beside your modeling window for comparison.
2. Inspect the generated shape
Compare the silhouette, thickness and visible details with the reference. Rotate the asset and inspect areas that were not visible in the photograph. Do not assume the back, underside or internal structure has been reconstructed correctly. If a feature is important to the design, check it directly in the model and decide whether it needs a manual correction.
3. Check scale in SketchUp
Place the asset in a simple test scene and compare it with a known measurement. Review its origin, orientation and grouping before making repeated copies. A model can look convincing in a preview while having an unsuitable scale for your project. Keep an untouched copy of the import so you can return to it if your cleanup changes too much.
4. Prepare an asset for reuse
Remove unnecessary hidden detail where appropriate and organize the result for placement. Check materials at a useful viewing distance and decide whether the geometry is suitable for a close-up or only a background object. Document the changes you made. For accurate dimensions and construction decisions, continue working from your measured design model rather than relying on the generated asset alone.
Practice with this AI photo to 3D model tutorial
Keep a short record of the inputs, changes and result from your AI photo to 3D model practice. Save the starting model and a separate working copy, then note the step at which your result differs from the demonstration. A clear comparison helps you decide what to repeat and makes a later question easier to explain. Repeat the exercise with one deliberate variation after the original example is understood.
When reviewing AI photo to 3D model, compare the result with the purpose of the exercise rather than only its appearance in a screenshot. Check the project from another view, inspect the important geometry and identify which choices depend on your software version or project brief. Keep the useful decisions and revise the ones that do not support your own design. The video remains a visual learning reference, while your project requirements determine the final result.
Decide whether a generated asset is useful
Judge the generated object by its intended role. An asset used far from the camera may not need the same detail as a close-up object. Inspect the outline and the parts that will remain visible in the final scene first. If these features are wrong, consider another reference or a manual model rather than spending time repairing details that will not solve the main mismatch.
Check the model from every side before using it repeatedly. The source photograph may leave the underside, back or internal structure uncertain. Identify which of these areas matters to the project and decide whether the generated interpretation is acceptable. Keep that decision separate from the material appearance: attractive textures cannot compensate for an unsuitable shape or scale.
When a model is worth keeping, save a cleaned working version with a clear name and retain the original import separately. Record the known measurement used to set its scale and the changes made to its materials or grouping. This helps you reuse the asset deliberately and makes it easier to revisit a problem when a different camera reveals more of the object.
Resources for this AI photo to 3D model tutorial
After watching this AI photo to 3D model tutorial, open AI Photo to 3D Model Training. Then explore SUAPP AI workflow for a related next step. Choose a resource that addresses the task you are practicing; you do not need to follow unrelated lessons simply to complete this exercise.
AI Photo to 3D Model Training
Read the companion guide and compare its resources with the operation shown in this video.
Open companion guide →SUAPP AI workflow
Use this related collection to plan the next practical task for your own project.
Explore related resources →Review generated geometry
Check a generated object from the back, underneath and along the silhouette. A convincing front view does not establish that the entire model is suitable for reuse. Compare the overall proportions with the reference, then identify which parts need remodeling and which can serve as a visual starting point. Keep the reference image alongside your notes so that you can distinguish an intentional design change from an interpretation made by the tool.
Test the model in a small scene before adding copies throughout a larger project. Review scale, orientation and material assignments after import. Preserve the original downloaded result as a separate file so that cleanup can be reversed. Decide whether the object is intended for a distant visual, a close presentation or a precise design task before judging the level of detail it requires.
AI photo to 3D model tutorial: common questions
Does a generated model have accurate dimensions?
Check the model against known dimensions after import. Visual similarity to a photograph does not establish dimensional or construction accuracy.
What should I do if the video does not play here?
Use the original YouTube link above to open the same video directly. Availability and any access requirements are controlled by the video owner. The embedded player retains its normal playback and full-screen controls.
How can I practice AI photo to 3D model after watching?
Follow the four-step plan on this page, save your starting model and compare one small variation with the original result. Return to the relevant part of the video when a step needs another review.