Create Ultra-Realistic 3D Models from a Single Photo Using Hitem3D AI
Blog post description.
AI TOOLS3D MODELINGSKETCHUP TUTORIALS
Short Post Description (paste here): Learn how Hitem3D AI turns a single image into a fully detailed, textured 3D model. This step-by-step guide explains how to upload photos, choose AI settings, and export your model for 3D projects.
11/22/20255 min read
Create Ultra-Realistic 3D Models from a Single Photo Using Hitem3D
For years, 3D modeling felt like a world reserved for experts.
You needed complex software, a powerful computer, and hours of precise work just to create one clean 3D asset. If you weren’t a professional modeler, the idea of turning a simple photo into a usable 3D model was almost impossible.
That era is over.
Today, AI is changing the rules of 3D content creation — and Hitem3D is one of the most exciting examples of that change. With this tool, you can upload a single image and let the AI generate a detailed 3D model for you, complete with geometry and, if you want, realistic materials.
Instead of manually building every edge and polygon, you focus on choosing the right photo and deciding how you want to use the result. Hitem3D handles the heavy lifting in the background.
Whether you are:
an interior designer who needs a specific piece of furniture,
a game developer looking for fast asset creation,
a product designer testing variations, or
a 3D artist who wants to speed up their workflow,
Hitem3D gives you a way to move from idea to model in minutes instead of days.
You can start using it directly from the browser — no installation, no plugin, no complicated setup:
👉 Official website: https://www.hitem3d.ai/create?sp_source=NiceTower
In the rest of this article, we’ll walk through how Hitem3D works in practice: from uploading your first image, to choosing the right resolution, to reviewing a real example of a chair converted from a single photo into a 3D model and new material variations.
1. Getting Started with Hitem3D
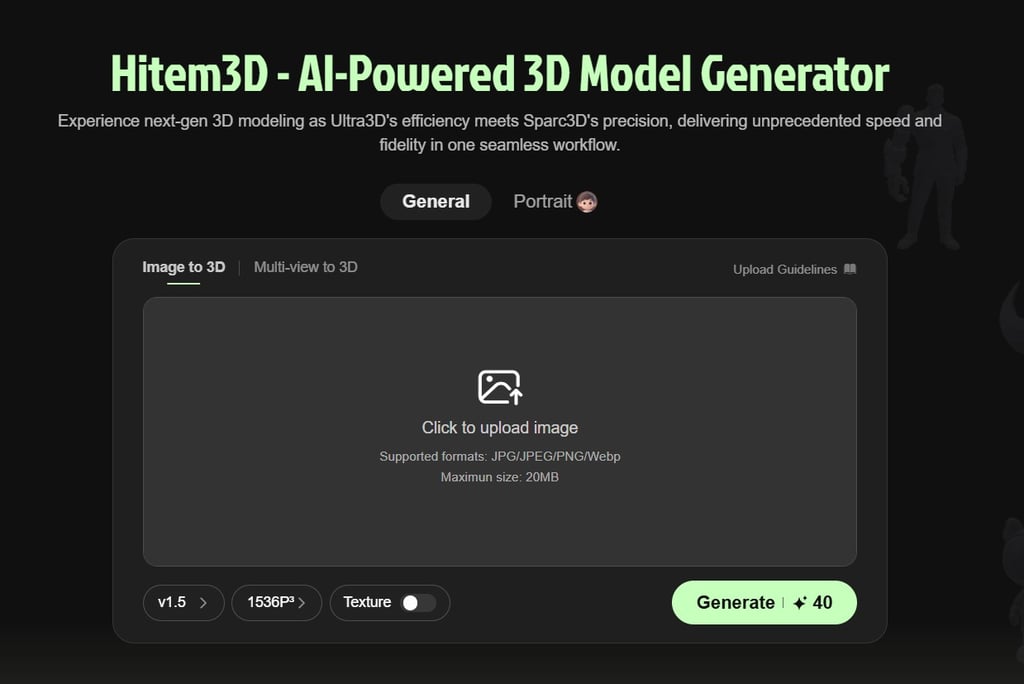
When you open the Hitem3D generator page, the first thing you see is a dark, modern interface with a clear focus area in the center:
“Click to upload image.”
The tool offers two main modes at the top:
General – for objects, furniture, products, props, and animals
Portrait – for faces, characters, and stylized humans
Most product shots, interior elements, and furniture models will use the General tab.
Under the upload area, you’ll find three key controls:
Model version – the AI model version (for example v1.5)
Resolution – how detailed the final 3D mesh will be
Texture toggle – whether you want only geometry or geometry + materials
What makes this interface strong is its simplicity. There are no overwhelming menus, no complex node trees, and no technical settings hidden behind advanced panels. Hitem3D is designed so that anyone who knows how to upload a file can generate a model.
2. Uploading Your First Image
To begin, you simply:
Click on the upload area
Choose your image (JPG, JPEG, PNG, or WebP)
Make sure the file size is within the 20 MB limit
For best results, your image should have:
A clear subject (the object you want to convert)
A relatively simple background
Good lighting, without heavy shadows or extreme highlights
A clean, focused angle where the main form is visible
The better your reference image, the cleaner and more accurate your final 3D model will be.
Once your image is uploaded, you’re ready to tune the resolution and texture settings — which is where Hitem3D becomes really flexible.
3. Understanding Resolution Levels in Hitem3D
One of the most important decisions you make inside Hitem3D is which resolution to use.
This choice affects three things at the same time:
How detailed your final model is
How long the generation takes
How many credits you spend
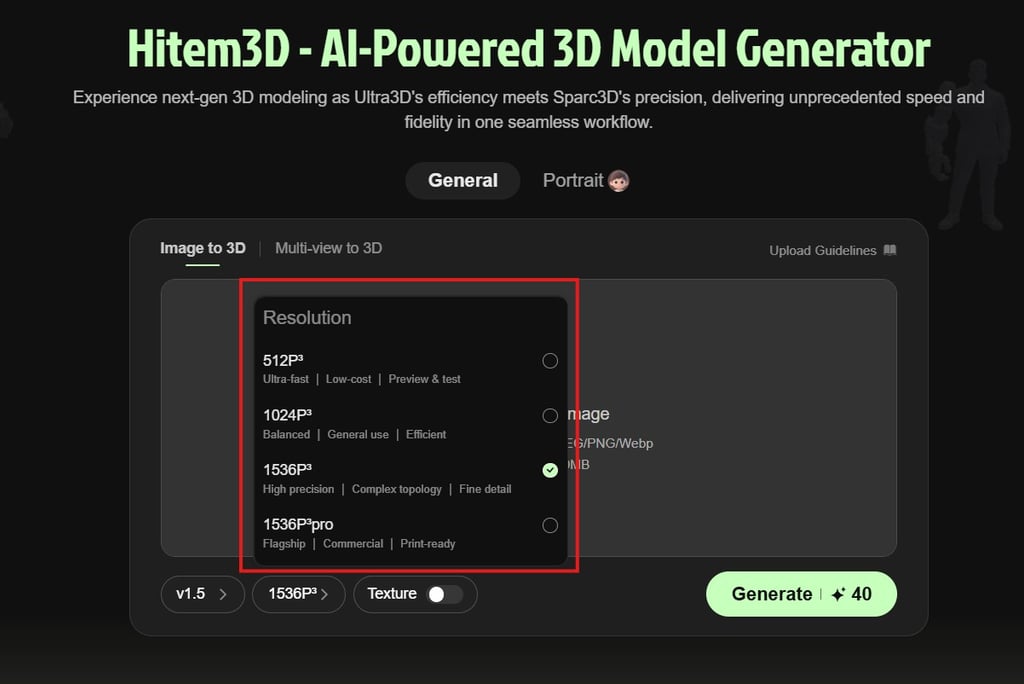
Hitem3D usually offers four main resolution tiers:
512P³ – Ultra-fast, low-cost, preview & test
Best when you want to quickly test an idea, explore composition, or simply see if an object works as a 3D model.
The mesh is simpler and lighter, perfect for blocking out scenes or testing style.
1024P³ – Balanced, general use, efficient
A great middle ground between speed and detail.
Ideal for assets that won’t be seen extremely close-up, such as background props, basic game objects, or secondary furniture.
1536P³ – High precision, complex topology, fine detail
Designed for objects where form and surface quality really matter.
Excellent for hero objects in a scene, furniture close-ups, and anything that will be rendered in high resolution.
1536P³ Pro – Flagship, commercial, print-ready
The most advanced and credit-expensive option.
Used when you need maximum fidelity for production, marketing renders, or even potential 3D printing workflows after cleanup.
4. Texture or No Texture?
Below the resolution settings, you’ll see the Texture toggle.
When Texture is OFF, Hitem3D focuses on creating a clean mesh.
When Texture is ON, the AI also generates realistic surface information — colors, shading, and material feel — making the asset ready for rendering in engines like SketchUp, Blender, Unreal, or V-Ray.
If your goal is fast prototyping or sculpting over the mesh, you might keep textures off.
If you want something that already looks close to a finished render, you definitely want textures enabled.
After choosing your resolution and texture preference, your next step is simple:
click Generate and let the AI do the work.
5. From Single Photo to Finished 3D Asset
To really understand what Hitem3D does, let’s walk through a real example:
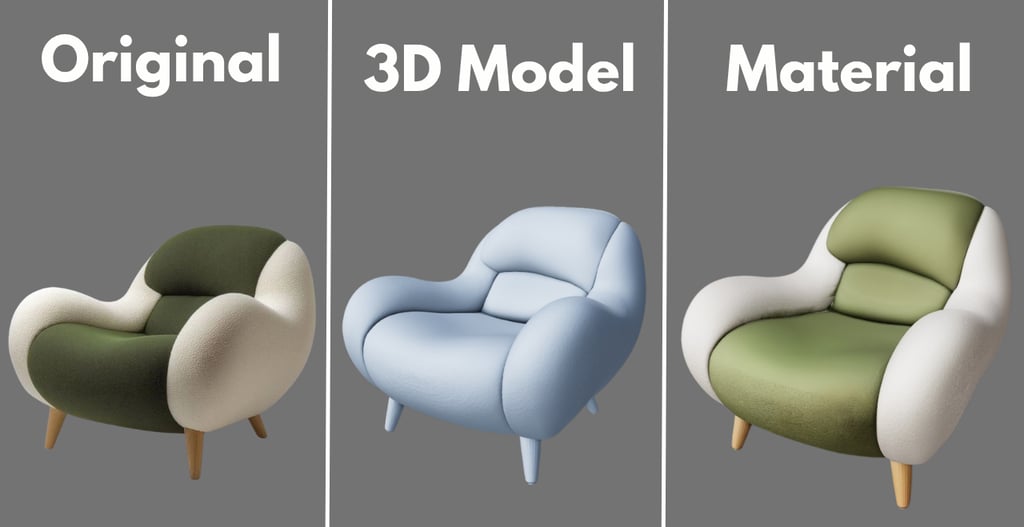
a modern armchair turned into a 3D model from just one reference image.
We start with a stylized chair rendered in soft fabric. The original image shows:
The overall silhouette and proportions
Cushion shapes and thickness
Rounded armrests and seat corners
Wooden legs and overall color palette
After uploading this image to Hitem3D, setting the resolution to 1536P³ and enabling Texture, the AI processes the input and reconstructs the chair as a 3D mesh.
The result comes in three conceptual stages:
Original – the reference image you provided
3D Model – the AI-generated geometry: clean, smooth, and ready for use in your 3D scene
Material – a version with fresh, AI-generated materials, allowing you to explore new color combinations and finishes
This workflow is powerful because you can:
Take a real product photo from a catalog and quickly turn it into a 3D object
Adjust materials later in your 3D software
Duplicate the model and create multiple variants — different colors, fabrics, or finishes — without remodeling anything from scratch
For interior designers, this means you can build a custom furniture library much faster.
For game developers and 3D artists, it gives you a way to fill scenes with believable assets without spending weeks on polygon-level modeling.
And all of it starts with a single image.
6. Who Is Hitem3D For?
Hitem3D is not just a toy or a tech demo.
It’s a practical tool that can fit into real production workflows. It’s especially valuable for:
Interior designers & architects – who need accurate furniture and object models for client presentations.
3D artists & visualizers – looking to speed up asset creation without sacrificing quality.
Game developers & indie creators – who need many models quickly for prototyping or stylized worlds.
Product designers & marketers – who want to visualize different finishes and materials based on a single product photo.
Of course, no AI is perfect. You may still need to clean up topology, tweak proportions, or adjust UVs in your 3D software.
But compared to modeling from scratch, the time savings are huge.
7. Try It Yourself
If you want to experience this workflow in your own projects, you can start directly from the official site:
👉 Generate your first model here:
https://www.hitem3d.ai/create?sp_source=NiceTower
There’s no need to install any software — everything runs in the browser. You only need your images, some credits, and a bit of curiosity.
8. Watch the Full Tutorial
If you prefer learning visually, I’ve also recorded a complete walkthrough where I:
Upload different images
Try various resolution levels
Enable textures
Review the generated models and materials
You can watch it on YouTube here:
👉 Full video tutorial: https://youtu.be/aTMmJvvrNyo
